Hi again folks. In this tutorial, i'm gonna show you how to make a simple logo. Fast and (hopefully) easy. Let's begin, shall we?
First of all, create a new document. I'm using 400x300 of dimension and white background
Set the foreground color with red color (#FF0000). Select Rounded Rectangle with Fill Pixels and Radius=20. We better create the rectangle in a new layer (Shift+Ctrl+N). I named it 'Base'

Ctrl+click Base layer and you'll get the rectangle selected. Create a new layer (i named it 'Shade'). Use Pen tool and create a path that looks like this:
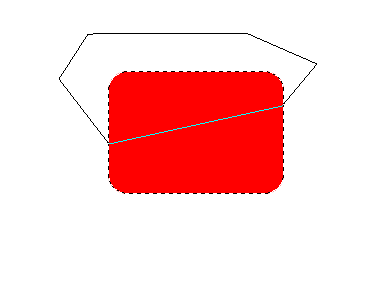
It doesn't matter the shape of the path outside the rect. The important thing is the path inside it. Now, right-clik the path (still with Pen Tool Selected) and select Make Selection. Choose Intersect With Selection for the Operation. Click OK.

Now select the Gradient Tool (with Foreground to Transparent and Linier Gradient), set the foreground color to light grey (#E1E1E1). In Shade layer, create gradient color from top-left to down-right of the rect.

Deselect it (Ctrl+D). Now select Base layer, use Burn Tool in the bottom and right side of the rect.

Let's add it a little bit. Ctrl+click Base layer, create a new layer (place it below Base layer by dragging it) and fill it with black color (#000000). Deselect current selection, select Move Tool, and move it a little bit with Arrow key, rightward and downward

Well, it's done. You'll just have to place a text on it. And i use a Gaussian Blur for the shadow. This is the final result:

Hope you enjoy this tutorial, as much as i enjoy writing it. See you on the next tutorial. Don't forget to drop a comment. Rock on!!!!!!
Komentar